Ransom.Win32.MCRYPT.A
Trojan-Ransom.Win32.Dcryptor.g (Kaspersky); Trojan-Spy.Win32.Gaxfid (Ikarus)
Windows


Threat Type: Ransomware
Destructiveness: No
Encrypted: No
In the wild: Yes
OVERVIEW
This Ransomware arrives on a system as a file dropped by other malware or as a file downloaded unknowingly by users when visiting malicious sites.
TECHNICAL DETAILS
Arrival Details
This Ransomware arrives on a system as a file dropped by other malware or as a file downloaded unknowingly by users when visiting malicious sites.
Installation
This Ransomware drops the following files:
- %System%\drivers\dcrypt.sys
- {malware path}\dcapi.dll
- {malware path}\dccrypt.sys
- {malware path}\igfxen.exe - detected as PUA.Win32.DiskCrypt.A
It drops and executes the following files:
- {malware path}\inst32.exe - if machine is 32bit
{malware path}\inst64.exe - if machine is 64bit
Autostart Technique
This Ransomware registers itself as a system service to ensure its automatic execution at every system startup by adding the following registry entries:
HKEY_LOCAL_MACHINE\SYSTEM\ControlSet001\
Services\dcrypt\Instances
DefaultInstance = dcrypt
HKEY_LOCAL_MACHINE\SYSTEM\ControlSet001\
Services\dcrypt\Instances\
dcrypt
Altitude = 87150
HKEY_LOCAL_MACHINE\SYSTEM\ControlSet001\
Services\dcrypt\Instances\
dcrypt
Flags = 0
HKEY_LOCAL_MACHINE\SYSTEM\ControlSet001\
Services\dcrypt\config
Flags = 0
HKEY_LOCAL_MACHINE\SYSTEM\ControlSet001\
Services\dcrypt\config
Hotkeys = 00 00 00 00 00 00 00 00 00 00 00 00 00 00 00 00
HKEY_LOCAL_MACHINE\SYSTEM\ControlSet001\
Services\dcrypt\config
sysbuild = 846
It adds and runs the following services:
- dcrypt
Other System Modifications
This Ransomware adds the following registry keys:
HKEY_LOCAL_MACHINE\SYSTEM\ControlSet001\
Services\dcrypt\Instances
HKEY_LOCAL_MACHINE\SYSTEM\ControlSet001\
Services\dcrypt\Instances\
dcrypt
HKEY_LOCAL_MACHINE\SYSTEM\ControlSet001\
Services\dcrypt\config
Other Details
This Ransomware does the following:
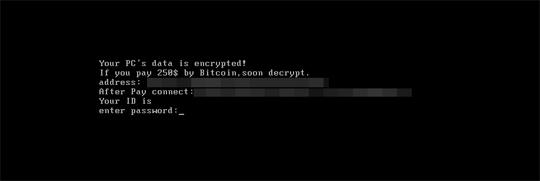
- After booting up your system, it will display the following ransom note:

- It modifies the Master Boot Record to display the ransom note
- The dropped file {malware path}\igfxen.exe requires specific arguments to perform it's malicious routine
SOLUTION
Step 1
Trend Micro Predictive Machine Learning detects and blocks malware at the first sign of its existence, before it executes on your system. When enabled, your Trend Micro product detects this malware under the following machine learning name:
- Troj.Win32.TRX.XXPE50FFF031
Step 2
Before doing any scans, Windows 7, Windows 8, Windows 8.1, and Windows 10 users must disable System Restore to allow full scanning of their computers.
Step 3
Note that not all files, folders, and registry keys and entries are installed on your computer during this malware's/spyware's/grayware's execution. This may be due to incomplete installation or other operating system conditions. If you do not find the same files/folders/registry information, please proceed to the next step.
Step 4
Restore your system's Master Boot Record (MBR)
To restore your system's Master Boot Record (MBR):
• On Windows 7 and Server 2008 (R2):
- Insert your Windows Installation DVD into the DVD drive, then press the restart button on your computer.
- When prompted, press any key to boot from the DVD.
- Depending on your Windows Installation DVD, you might be required to choose the installation language. On the Install Windows window, choose your language, locale, and keyboard layout or input method. Click Repair your computer.
- Select Use recovery tools that can help fix problems starting Windows. Select your installation of Windows. Click Next.
- If the Startup Repair window appears, click Cancel, Yes, then Finish.
- In the System Recovery Options menu, click Command Prompt.
- In the Command Prompt window, type the following then press Enter:
BootRec.exe /fixmbr - Type exit and press Enter to close the Command Prompt window.
- Click Restart to restart your computer normally.
• On Windows 8, 8.1, 10, and Server 2012:
- Insert your Windows Installation DVD in the DVD drive, then restart your computer.
- When prompted, press any key to boot from the DVD.
- Depending on your Windows Installation DVD, you might be required to select the keyboard layout. Then on the Windows Setup window, choose your language, locale, and input method. Click Next, then click Repair your computer.
- Click Troubleshoot>Advanced Options>Command Prompt.
- In the Command Prompt window, type the following then press Enter:
BootRec.exe /fixmbr - Type exit and press Enter to close the Command Prompt window.
- Click Continue to restart the system normally.
Step 5
Restart in Safe Mode
Step 6
Delete this registry key
Important: Editing the Windows Registry incorrectly can lead to irreversible system malfunction. Please do this step only if you know how or you can ask assistance from your system administrator. Else, check this Microsoft article first before modifying your computer's registry.
- In HKEY_LOCAL_MACHINE\SYSTEM\ControlSet001\Services\dcrypt
- Instances
- Instances
- In HKEY_LOCAL_MACHINE\SYSTEM\ControlSet001\Services\dcrypt
- config
- config
Step 7
Search and delete this file
- %System%\drivers\dcrypt.sys
- {malware path}\dcapi.dll
- {malware path}\dccrypt.sys
- {malware path}\igfxen.exe
- {malware path}\inst32.exe - if machine is 32bit
- {malware path}\inst64.exe - if machine is 64bit
Step 8
Restart in normal mode and scan your computer with your Trend Micro product for files detected as Ransom.Win32.MCRYPT.A. If the detected files have already been cleaned, deleted, or quarantined by your Trend Micro product, no further step is required. You may opt to simply delete the quarantined files. Please check this Knowledge Base page for more information.
Did this description help? Tell us how we did.


