Companies are adopting cloud-first development to improve application deployment speed and cohesion, and containers have become an integral part of this modern software. Similar to a hardware technicians toolbox, containers hold all the dependencies (tools) the software needs to run smoothly in different computing environments without hitches.
Containers are built from images, which are essentially a file that zips together all the components needed to run an application—code, configuration files, libraries (including specific versions), environment variables, and more.
Great technologies like Docker and Kubernetes facilitate containerization and help drive adoption. While Docker runs on a single node and helps build and manage images, Kubernetes orchestrates, enabling scaling and efficiently distributing containers across a cluster of nodes.
Container image registries store container images privately (within an organization) or publically (using open source platforms, like GitHub or Docker Hub). Docker Hub contains many base images to help you build your own custom images (such as nginx, Node, Alpine, and much more). It also includes a repository of custom images created by others, you can pull, use, and improve. Lastly, the adoption of public container images helps drive innovation.
OpenShift Container Registry (OCR) is one example of a private container registry that runs integrated with the OpenShift platform and supports integration with other private registries. Its role-based access controls enable you to manage who can pull and push which container images.
Although containers help developers easily port their application between different environments without worrying about a chain of dependencies, they also have security challenges. Examples of these include improper configurations from human error or possible lack of understanding of the technology and, perhaps the biggest challenge, security vulnerabilities.
In this article, we’ll focus on security vulnerabilities and explore some first steps to boost confidence in your container security, discover how image and registry scanning throughout the pipeline helps improve container security, and discuss how to implement container image scanning and policy-based deployment control.
Common Containerization Security VulnerabilitiesPublic Registry Images
Some open source images may contain malicious commands that can cause vulnerabilities on deployment. You can mitigate this by using official Docker images whenever possible or using open source images from only trusted sources. But keep in mind that these precautions are still not error-proof, and the only way to ensure a satisfactory security level is by integrating a scanning tool.
Outdated Packages and Libraries
Images are immutable. Once they are built, their content cannot change. This means that, over time, some libraries, packages, and dependencies become obsolete and cause issues. Because of this, you can’t completely trust the dependency tree.
Most vulnerabilities are from using outdated packages, however, you may need to keep using outdated packages for compatibility. Including a vulnerability scanner in the continuous integration and continuous deployment (CI/CD) pipeline helps identify and fix issues with outdated packages before deployment. This is critical because it is a lot easier to fix and remediate in the pipeline rather than removing a vulnerable image out of production.
Mishandling secrets
Sensitive connection information may find its way into the container images such as secrets, usernames and passwords, access keys, private key files, etc. Attackers may compromise the image by using malicious scripts to steal resources from the device where an image is deployed. They can also steal sensitive credentials, launch denial-of-service (DoS) attacks, and more. Malicious acts can occur when the image provides root access to the entire container or if the API endpoints are publicly accessible. The SolarWinds attack, for example, allowed hackers to access and compromise network infrastructure.
How to Guard Against Container VulnerabilitiesKnowing the benefits and risks of containerization, software teams using containers must manage container security without trading off application delivery time. They can do this by integrating an automated security layer into the DevOps workflow. This process is called DevSecOps or Secure DevOps.
In the past, a specific operations or infrastructure team in the final stage of development took care of security. That was fine when development cycles lasted months or even years, but the story is different now—DevOps now involves rapid and frequent development cycles (sometimes weeks or days). Obsolete security practices can hamper even the most efficient DevOps initiatives, creating unnecessary friction!
By integrating security into the DevOps process, we ensure applications are secure, stable, and high performing on deployment. While it’s best to perform layered security checks for vulnerabilities pre-runtime, there is should also be real-time monitoring of container images throughout the application lifecycle. Checking for vulnerabilities from build time to run time provides the total package of end-to-end container lifecycle security protection.
There are five essential workflows for Secure DevOps when it comes to container security:
- Image scanning
- Runtime security
- Compliance
- Kubernetes and container monitoring
- Application and cloud service monitoring
To start things off, the first line of defense is container image scanning, which helps spot vulnerabilities early enough so developers can eliminate them before they are exploited.
Image Scanning
Image scanning analyzes a container image’s layered content and the build process to detect vulnerabilities, security issues, and less than ideal practices. Image scanning can be integrated into different steps of the DevSecOps workflow. For instance, image scanning in a CI/CD pipeline can block vulnerabilities from ever reaching a container registry and scanning in the registry can guard against vulnerabilities in third-party images.
Typically, image scanning works by parsing through packages and other dependencies defined in a container image file, known as layers. It checks if they contain any known vulnerabilities and alerts builders of issues. With this knowledge, developers can then update the images to rid them of the detected threats.
To scan images, you need a specialized tool like Docker Hub that offers built-in scanners. You can choose from many image and registry scanners in the market, all with varying functions and user experiences.
It’s best to select a reliable and trusted scanner that can work with a multitude of container image registries. One option is Trend Micro Cloud One™ – Container Security, which specializes in providing total package, comprehensive container lifecycle security including container image scanning. Container Security image scanning tool checks for vulnerabilities, malware, secrets, and keys as well as aids in compliance validation.
Container Security makes the entire image scanning process—and other aspects of security integration—seamless by enabling you to build security policies from scan results, ensuring that only safe images that meet your preset security criteria are deployed.
Depending on the specifics of your security challenges, you can select from three use cases: container image scanning and policy-based deployment control, policy-based deployment control, and container image scanning with policies.
Container image scanning and policy-based deployment control provide the highest security, so let’s look at how to use these features.
Container Image Scanning and Policy-Based Deployment Control
To begin implementing container image scanning and policy-based deployment control, first sign in to your Trend Micro account or set up a new account for free. Then, go to the Container Security page, shown below:

Now, we need to set up the policy for policy-based deployment control. This is where we put together the set of rules we intend to enforce on our repository—and where the actual deployment control happens. The policies are separated into categories:
- Pod properties
- Image properties
- Container properties
- Scan results
You can set your rules to either log or block images and containers based on certain conditions. To leverage the full power of policy-based deployment control, set up the container image security component, which scans images for malware and vulnerabilities. Remember, without scanning the images, whatever rules you set under the scan results section don’t take effect.
Let’s go ahead and create the policy, then link it to an existing Amazon Elastic Kubernetes Service (EKS) cluster. To do this, follow this procedure:
- Click on the shield icon on the left menu.
- Fill in a name and description in the form.
- Check the boxes for the rules we intend to enforce, selecting log or block based on how we want the tool to handle each scenario.
Here, we named the policy “Restrictive_Policy” and set it to block privileged containers and containers that run as root. It simply logs or ignores everything else.
After filling out the form and setting everything up, click Create at the bottom right.

Next, we connect our container security tool to an Amazon EKS cluster hosted on Amazon Web Services (AWS). To add a cluster, go to the Clusters page, indicated by a stack of three lines on the left menu. Click Add to add a cluster, triggering the dialog shown below:

Fill in the necessary details, as shown in the image above. The Runtime Security feature is a Trend Micro Cloud One™ – Application Security integration that provides runtime security for Kubernetes clusters and can detect and protect against illegal file access and remote command execution. It’s currently in preview, so to enable it, request access. When you’re done, click Next.
The window below appears. Follow the instructions to create an “overrides.yaml” file in the application directory.

Copy the details in the first section of this window into overrides.yaml. Without this file, you can’t run the helm command.
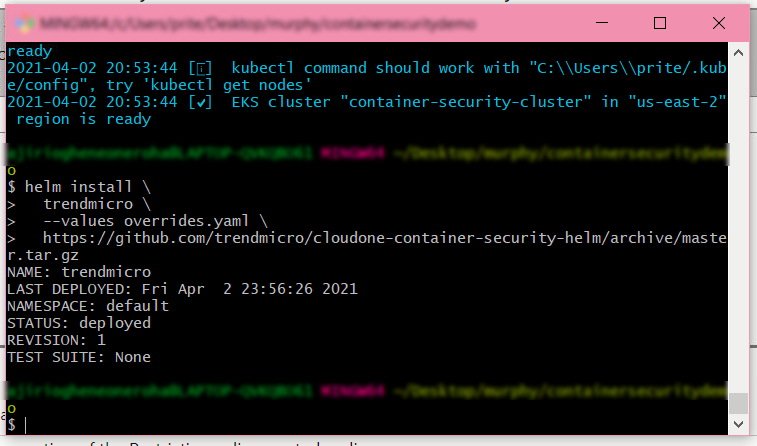
Next, copy the Helm command in the second section and run it in your terminal. Note that for the command to work, you must install Helm on the system.
This is what you should see when you run the command:

Note the STATUS is deployed.
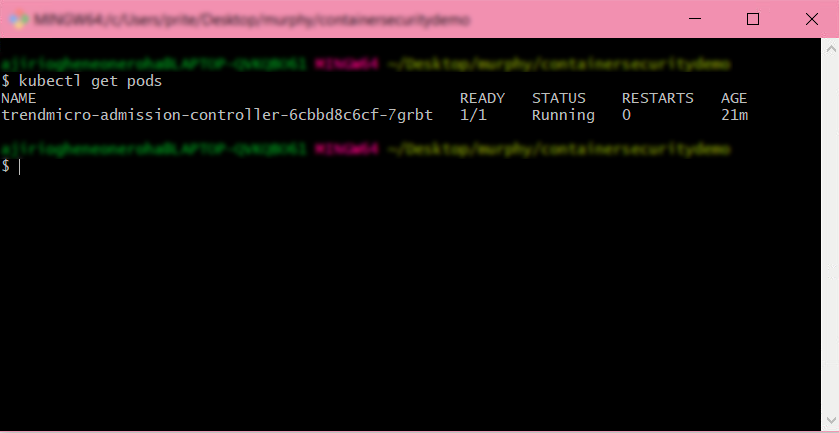
The cluster also appears in the list on the clusters page. If you run kubectl get pods, you should notice an admission controller listed there.

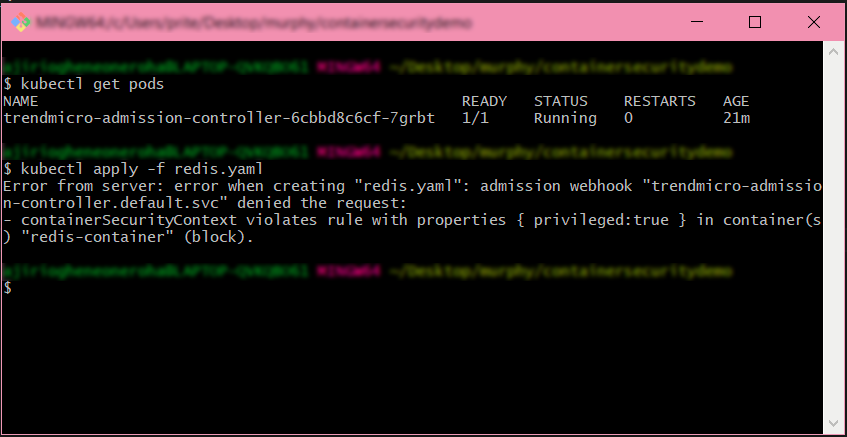
Recall that in our restrictive policy, we set it to block privileged containers. Now we’ll try to deploy a pod that has a container with privileged set to true. We use the redis image in this case:

Notice from the terminal window below that it returns an error because one of the rules in our policy is violated.

This is just one example of what policy-based deployment control can do. You can try tweaking the policy rules and observe the outcome.
As stated earlier, to reap the full benefits of Trend Micro Cloud One™ security services platform, you need to incorporate container image scanning into your DevOps process. It provides the ability to:
- Detect OS-level and application-level vulnerabilities
- Detect malware
- Detect secrets and keys embedded in your applications
- Perform custom scan queries to find suspicious or unwanted files
- Check image content against a compliance checklist that includes items from regulations like PCI-DSS in the payment card industry, HIPAA in healthcare, and NIST 800-190 for application container security
In Container Security, the powerful container image scanning tool scans Docker images in any registry that supports the Docker Registry V2 API and allows catalog listing. Some of these registries include:
- Docker Trusted Registry (DTR)
- Google Container Registry (GCR)
- Amazon Elastic Container Registry (ECR)
- Azure Container Registry (ACR)
- VMware Harbor Registry
- JFrog Artifactory
- Sonatype’s Nexus Repository
- Quay container registry
Container Security carries out periodic scans (automatically running at 12:00 AM UTC for selected registries), manual scans when you click the Scan Now button, or automated scans through the Container Security API. The interactive dashboard looks like this:

The scan results here then serve as reference data for the Scan Results section of the policy (as we saw earlier when we created the Restrictive Policy).
Next Steps
Image and registry scanning throughout the whole DevOps process helps catch vulnerabilities before and after you deploy your container images. This helps protect your containers from errors and intentional vulnerabilities in public registry images, outdated packages and libraries, and back doors for cyberattacks. Tools like Container Security help automatically scan your images for security risks.
Now that you know more about containers, images, and their risks, and the benefits of integrating image scanning into your entire CI/CD pipeline, try Trend Micro Cloud One for 30 days to check out all the cloud-native security solutions. Our detailed documentation points you in the right direction, and our support team can help with any other questions.
Further Reading
- Trend Micro Cloud One™ – Container Security
- What is Container Security?
- Configure Runtime Security
- The Problem with Containerization
- Using Container Registries Securely
- Common Container and Kubernetes Vulnerabilities
- How to Find and Fix Docker Container Vulnerabilities in 2020
- 12 Container Image Scanning Best Practices to Adopt in Production
- Docker Image Security Scanning: What It Can and Can't Do
- What is DevSecOps?
Description
Learn to secure your containers with image and registry scanning. This article explores key container vulnerabilities, and how to guard against them with cloud security tools like policy-based deployment control.
Read up on how to secure your Azure container instances: https://www.trendmicro.com/en_us/devops/20/g/secure-azure-container-instances.html


