Use the Conformity Knowledge Base AI to help improve your Cloud Posture

AWS Web Application Firewall In Use

Trend Cloud One™ – Conformity is a continuous assurance tool that provides peace of mind for your cloud infrastructure, delivering over 1000 automated best practice checks.

Risk Level: Medium (should be achieved)
Rule ID: WAF-001

Ensure that Amazon Web Application Firewall (WAF) service is currently in use in order to protect your AWS-powered web applications from security exploits that could affect their availability and overall security, or consume excessive resources (resource starvation attacks). Amazon WAF is a web application firewall service that lets you monitor any HTTP(S) requests that are forwarded to AWS CloudFront or AWS ELB. To enable AWS WAF protection you simply create web Access Control Lists (ACLs), define the ACLs rules, which reference one or more conditions, and the actions to take when each rule is satisfied. Then the newly created WAF ACLs can be attached, for example, to the Amazon CloudFront CDN distribution used by your web applications. To quickly get started with AWS WAF you can also use AWS Pre-configured Protections, an automated solution that consists of a pre-configured AWS WAF template that includes a set of predefined ACL rules, which can be customized to best fit your requirements, designed to block common web-based attacks such as bad bots, Cross-Site Scripting and SQL Injection.

This rule can help you with the following compliance standards:

  • APRA
  • MAS
  • NIST4

For further details on compliance standards supported by Conformity, see here.

This rule can help you work with the AWS Well-Architected Framework.

This rule resolution is part of the Conformity Security & Compliance tool for AWS.

Security

- Using AWS Web Application Firewall (WAF) service can have a significant impact on the security and availability of the websites/web applications running within your AWS environment. The main benefits of using Amazon WAF are: strong protection against common web-based attacks – safeguards your web applications from SQL Injection (SQLi) attacks, Cross-site scripting (XSS) attacks, Cross-Site Request Forgery (CSRF) and HTTP Flood (DDOS-based) attacks by filtering incoming traffic based on the firewall rules that you create, improved web traffic visibility – provides real-time visibility into your web traffic, insight data that can be used to create custom rules and set alerts in AWS CloudWatch, ease of deployment and maintenance – deploys easily without the need for additional software and provides a full-featured API that you can use to automate the creation, deployment, and maintenance of your web security rules, integrate well with your applications development process – allows you to define application-specific rules that increase security as you develop your web apps, and cost effective – you pay only for what you use as the pricing is based on how many rules you create and how many requests your web applications receive, there are no upfront commitments nor minimum fees.


Audit

To determine if AWS WAF is used as web application firewall service within your AWS account, perform the following:

Using AWS Console

01 Sign in to the AWS Management Console.

02 Navigate to AWS WAF dashboard at https://console.aws.amazon.com/waf/.

03 In the left navigation panel, under AWS WAF section, choose Web ACLs. A web ACL is a collection of firewall rules that allow you to take control over the web requests that your AWS resources (i.e. CloudFront CDN distributions and Application Load Balancers) respond to. If there are no web ACLs listed on the page, instead a Getting Started page is displayed:

AWS WAF

the Amazon Web Application Firewall service is not currently used within your AWS account.

Using AWS CLI

01 Run list-web-acls command (OSX/Linux/UNIX) to describe the web Access Control Lists (ACLs) defined within your AWS account for the WAF service:

aws waf list-web-acls

02 The command output should return an array named WebACLs populated with the requested web ACLs objects (metadata) or an empty WebACLs array if there are no web ACLs available:

{
    "WebACLs": []
}

If the WebACLs array returned by the list-web-acls command output us empty (as shown in the example above), there are no web ACLs currently defined within your AWS account, therefore the Amazon Web Application Firewall service is not enabled to protect your web applications from common web-based exploits.

Remediation / Resolution

In order to enable AWS WAF as the web firewall service to protect your AWS-powered web applications from security exploits, you must create one or more web ACLs, each ACL containing rules and actions to perform when a rule is satisfied. Once the necessary rules and actions are defined, the new web ACL can be assigned to the CloudFront distribution used by your web application as CDN solution or to the Application Load Balancer, managed by the AWS ELB service, used by your application as load balancing solution. To create and assign your first AWS WAF web ACL, perform the following:

Note: As example, this conformity rule demonstrates how to enable AWS WAF to protect a web application associated with a global AWS Cloudfront distribution from exploits that originate from an IP range that is known to be operated by malicious actors such as spammers, botnets and malware distributors.

Using AWS Console

01 Login to the AWS Management Console.

02 Navigate to Web Application Firewall dashboard at https://console.aws.amazon.com/waf/.

03 In the left navigation panel, under AWS WAF section, choose Web ACLs.

04 Click Create web ACL button from the WAF dashboard top menu to initiate the Access Control List setup process.

05 On the Name web ACL page, within the Web ACL name and CloudWatch metric name fields, provide unique names for the new WAF web ACL and the required AWS CloudWatch metric, then select Global (Cloudfront) from the Region dropdown list to specify the target AWS region – in this case the target is global (all regions) and the new ACL is assigned to a global Cloudfront distribution. Click Next to continue the web ACL build process.

06 On the Create Conditions page, choose the IP match conditions category to specify the IP address range that you want to use to control access to your web application content delivered by the associated CloudFront CDN distribution. Click Create condition button to open the Create IP match condition panel, then provide the following information:

  1. In the Name box, enter a unique name for the new IP-based condition.
  2. Select IPv4 from the IP Version category to specify the version of the IP range used.
  3. In the Address box, enter the IP address range that you want to block using the appropriate CIDR notation (i.e. /24). AWS WAF supports /8, /16, /24, and /32 CIDR blocks for IPv4.
  4. Click Add IP address or range button to attach the defined IP range of the request to filter on.
  5. Click Create to instantiate the IP match condition for your new web ACL.

07 Click Next to continue the setup.

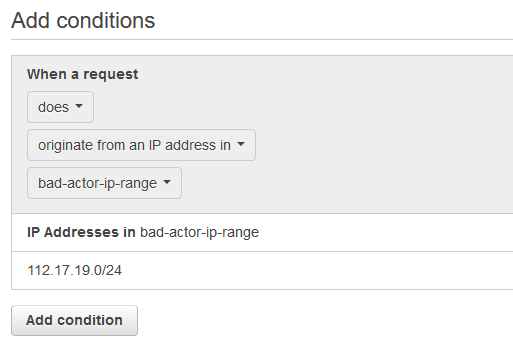
08 On the Create rules page, under Add rules to a web ACL, click Create rule to define the ACL rule that will be reference the newly created condition, which must be satisfied in order to activate the rule. On the Create rule panel, provide names for the new rule and the necessary CloudWatch metric, then specify the condition created at step no. 6 using the Add conditions section forms, e.g.

WAF Add Conditions

Click Create to instantiate the new rule.

09 Inside If a request matches all of the conditions in a rule, take the corresponding action section, select the appropriate action to take if a request matches the rule condition – in this case select Block to block all requests coming from an IP address available within the specified malicious IP range.

10 In the If a request doesn't match any rules, take the default action section, choose the default action that the ACL must take if a request doesn't match any of the rules defined – in this case set Default action to Allow all requests that don't match any rules.

11 Click Review and create button to continue.

12 On the Review and create page, review the web ACL settings then click Confirm and create to generate your new web ACL. Once created the web ACL will be listed on the Web ACLs WAF page. On the Amazon Cloudfront Distributions page, the status of the distribution associated with the new web ACL will change from In Progress to Deployed once the configuration change is deployed through the entire CDN network (it should take less than 15 minutes).

(Optional): To associate the web ACL created earlier with other CloudFront web distributions (other than the one selected during the ACL setup), perform the following actions:

Using AWS Console

01 Login to the AWS Management Console.

02 Navigate to Cloudfront dashboard at https://console.aws.amazon.com/cloudfront/.

03 On the Distributions page, select the CDN distribution that you want to update.

04 Click the Distribution Settings button from the dashboard top menu to access the selected distribution configuration page.

05 On the General tab click the Edit button.

06 On the Distribution Settings page, select the newly created ACL from the AWS WAF Web ACL dropdown list.

07 Click Yes, Edit to apply the changes. The CDN distribution status will change from In Progress to Deployed once the configuration change is deployed through the Cloudfront Content Delivery Network.

Using AWS CLI

01 Execute get-change-token command (OSX/Linux/UNIX) to get a change token for working with the WAF service through AWS CLI. A change token is a unique string required each time you need to create, update or delete WAF objects, that can be used to avoid sending conflicting API requests to AWS WAF service:

aws waf get-change-token

02 The command output should return the new WAF change token:

{
    "ChangeToken": "3ub5d8bb-73c6-4c8d-8922-bcf38f134971"
}

03 Now begin to create the WAF components necessary for building the web Access Control List (ACL). Run create-ip-set command (OSX/Linux/UNIX) using the unique token generated at the previous step as parameter to create an IPSet object used to specify which web requests you want to block based on the IP addresses that the requests originate from:

aws waf create-ip-set
    --name BadActorsIPRange
    --change-token 3ub5d8bb-73c6-4c8d-8922-bcf38f134971

04 The command output should return the IPSet object metadata:

{
    "IPSet": {
        "IPSetId": "755ee7a9-4f75-40cf-823a-b7762e746e22",
        "Name": "BadActorIPRange",
        "IPSetDescriptors": []
    },
    "ChangeToken": "3ub5d8bb-73c6-4c8d-8922-bcf38f134971"
}

05 Create an IPSetDescriptor JSON object to define the IP range (IPv4) that you want to block using the WAF web ACL (replace XXX.XXX.XXX.XXX/24 with the IP range that you want to block), then save the entire object definition in a JSON document named waf-ipset-params.json:

[
  {
    "Action": "INSERT",
    "IPSetDescriptor": {
      "Type": "IPV4",
      "Value": "XXX.XXX.XXX.XXX/24"
    }
  }
]

06 Run update-ip-set command (OSX/Linux/UNIX) to attach the IPSetDescriptor object to the IPSet component created at step no. 3 by passing the JSON document defined at step no. 5 as command parameter:

aws waf update-ip-set
    --ip-set-id 55ee7a9-4f75-40cf-823a-b7762e746e22
    --change-token 3ub5d8bb-73c6-4c8d-8922-bcf38f134971
    --updates file://waf-ipset-params.json

07 The command output should return the WAF change token used to submit the API requests for creating the WAF components:

{
    "ChangeToken": "3ub5d8bb-73c6-4c8d-8922-bcf38f134971"
}

08 Run create-rule command (OSX/Linux/UNIX) to create the WAF rule that contains the IPSet object defined earlier (identified by the change token). The rule is required by the web ACL to block the requests that satisfy the condition set:

aws waf create-rule
    --name BlockBadActorIPRange
    --metric-name BlockBadActorIPsMetric
    --change-token 3ub5d8bb-73c6-4c8d-8922-bcf38f134971

09 The command output should return the new WAF rule metadata:

{
    "ChangeToken": "3ub5d8bb-73c6-4c8d-8922-bcf38f134971",
    "Rule": {
        "Predicates": [],
        "MetricName": "BlockBadActorIPsMetric",
        "Name": "BlockBadActorIPRange",
        "RuleId": "c0f0f89c-27d1-43d4-8a53-a1cb0d987316"
    }
}

10 Run create-web-acl command (OSX/Linux/UNIX) to create the AWS WAF web Access Control List that will be attached later to the Cloudfront distribution used as CDN solution for your web application:

aws waf create-web-acl
    --name MaliciousWebAppViewers
    --metric-name MaliciousWebAppViewersMetric
    --default-action Type=BLOCK
    --change-token 3ub5d8bb-73c6-4c8d-8922-bcf38f134971

11 The command output should return the new web ACL metadata:

{
    "WebACL": {
        "DefaultAction": {
            "Type": "BLOCK"
        },
        "Rules": [],
        "MetricName": "MaliciousWebAppViewersMetric",
        "WebACLId": "a2828f33-de1c-4a01-a4fb-fc4f83ee39ad",
        "Name": "MaliciousWebAppViewers"
    },
    "ChangeToken": "3ub5d8bb-73c6-4c8d-8922-bcf38f134971"
}

12 Define the ActivatedRule object that contains the reference to the web ACL rule created earlier and the default action that must be taken if a request doesn't match the rule set. Save the definition in a JSON file named file://web-acl-rule-params.json:

[
  {
    "Action": "INSERT",
    "ActivatedRule": {
      "Priority": 1,
      "RuleId": "c0f0f89c-27d1-43d4-8a53-a1cb0d987316",
      "Action": {
        "Type": "BLOCK"
      }
    }
  }
]

13 Run update-web-acl command (OSX/Linux/UNIX) to attach the ActivatedRule object defined at the previous step to the AWS WAF web Access Control List created earlier:

aws waf update-web-acl
    --web-acl-id a2828f33-de1c-4a01-a4fb-fc4f83ee39ad
    --change-token 3ub5d8bb-73c6-4c8d-8922-bcf38f134971
    --update file://web-acl-rule-params.json

14 The command output should return the same change token, used to submit API requests to AWS WAF:

{
    "ChangeToken": "3ub5d8bb-73c6-4c8d-8922-bcf38f134971"
}

15 Now that the AWS WAF web ACL is ready for use, take the required steps to associate it with your Cloudfront CDN distribution. Run get-distribution-config command (OSX/Linux/UNIX) to extract the configuration information from the CDN distribution that you want to protect with AWS WAF. The following command returns the configuration object of a web distribution identified by the ID G1ZAENK49GWYU:

aws cloudfront get-distribution-config
    --id G1ZAENK49GWYU

16 The command output should return the selected distribution configuration information:

{
    "ETag": "C4I0SFGSBMGXY",
    "DistributionConfig": {
        "Comment": "",
        "CacheBehaviors": {
            "Quantity": 0
        },
        "Logging": {
            "Bucket": "cc-v2-web-app.s3.amazonaws.com",
            "Prefix": "cloudconformity/",
            "Enabled": true,
            "IncludeCookies": false
        },

        ...

        "ViewerCertificate": {
            "CloudFrontDefaultCertificate": true,
            "MinimumProtocolVersion": "SSLv3",
            "CertificateSource": "cloudfront"
        },
        "Restrictions": {
            "GeoRestriction": {
                "RestrictionType": "none",
                "Quantity": 0
            }
        },
        "Aliases": {
            "Items": [
                "cdn.cloudconformity.com"
            ],
            "Quantity": 1
        }
    }
}

17 Modify the configuration information returned at the previous step to attach the AWS WAF web ACL created earlier by setting the ACL ID as the WebACLId property value (as shown in the example below) and save the new configuration in a JSON document named cloudfront-waf-integration.json:

{
    "ETag": "C4I0SFGSBMGXY",
    "DistributionConfig": {
        "Comment": "",
        "CacheBehaviors": {
            "Quantity": 0
        },
        "Logging": {
            "Bucket": "cc-v2-web-app.s3.amazonaws.com",
            "Prefix": "cloudconformity/",
            "Enabled": true,
            "IncludeCookies": false
        },
        "WebACLId": "a2828f33-de1c-4a01-a4fb-fc4f83ee39ad",
        "Origins": {
            "Items": [
                {
                    "OriginPath": "/cloudoneconformity/assets",
                    "CustomOriginConfig": {
                        "OriginProtocolPolicy": "https-only",
                        "HTTPPort": 80,
                        "OriginSslProtocols": {
                            "Items": [
                                "TLSv1",
                                "TLSv1.1",
                                "TLSv1.2"
                            ],
                            "Quantity": 3
                        },
                        "HTTPSPort": 443
                    },
                    "CustomHeaders": {
                        "Quantity": 0
                    },
                    "Id": "cloudconformity.com-custom-origin",
                    "DomainName": "cloudconformity.com"
                }
            ],
            "Quantity": 1
        },
        "DefaultRootObject": "index.html",
        "PriceClass": "PriceClass_All",
        "Enabled": true,
        "DefaultCacheBehavior": {
            "TrustedSigners": {
                "Enabled": false,
                "Quantity": 0
            },
            "TargetOriginId": "cloudconformity.com-custom-origin",
            "ViewerProtocolPolicy": "allow-all",
            "ForwardedValues": {
                "Headers": {
                    "Quantity": 0
                },
                "Cookies": {
                    "Forward": "none"
                },
                "QueryString": false
            },
            "MaxTTL": 31536000,
            "SmoothStreaming": false,
            "DefaultTTL": 86400,
            "AllowedMethods": {
                "Items": [
                    "HEAD",
                    "DELETE",
                    "POST",
                    "GET",
                    "OPTIONS",
                    "PUT",
                    "PATCH"
                ],
                "CachedMethods": {
                    "Items": [
                        "HEAD",
                        "GET",
                        "OPTIONS"
                    ],
                    "Quantity": 3
                },
                "Quantity": 7
            },
            "MinTTL": 0,
            "Compress": false
        },
        "CallerReference": "1478460217572",
        "ViewerCertificate": {
            "CloudFrontDefaultCertificate": true,
            "MinimumProtocolVersion": "SSLv3",
            "CertificateSource": "cloudfront"
        },
        "CustomErrorResponses": {
            "Quantity": 0
        },
        "Restrictions": {
            "GeoRestriction": {
                "RestrictionType": "none",
                "Quantity": 0
            }
        },
        "Aliases": {
            "Items": [
                "cdn.cloudconformity.com"
            ],
            "Quantity": 1
        }
    }
}

18 Finally, run update-distribution command (OSX/Linux/UNIX) to update your AWS Cloudfront distribution in order to integrate it with the AWS WAF service. The following command example updates a CloudFront CDN web distribution with the ID G1ZAENK49GWYU and the ETag C4I0SFGSBMGXY (an ETag is a header ID exposed when a CDN distribution configuration is retrieved, e.g. "ETag": "C4I0SFGSBMGXY"), using a JSON configuration document with the file name cloudfront-waf-integration.json:

aws cloudfront update-distribution
    --id G1ZAENK49GWYU
    --distribution-config file://cloudfront-waf-integration.json
    --if-match C4I0SFGSBMGXY

19 The command output should return the metadata for the updated CDN distribution:

{
    "Distribution": {
        "Status": "Deployed",
        "DomainName": "cxu41pcmtg6dve.cloudfront.net",
        "InProgressInvalidationBatches": 0,
        "DistributionConfig": {
            "Comment": "",
            "CacheBehaviors": {
                "Quantity": 0
            },
            "Logging": {
                "Bucket": "cc-v2-web-app.s3.amazonaws.com",
                "Prefix": "cloudconformity/",
                "Enabled": true,
                "IncludeCookies": false
            },
            "WebACLId": "a2828f33-de1c-4a01-a4fb-fc4f83ee39ad",

            ...

            "Restrictions": {
                "GeoRestriction": {
                    "RestrictionType": "none",
                    "Quantity": 0
                }
            },
            "Aliases": {
                "Items": [
                    "cdn.cloudconformity.com"
                ],
                "Quantity": 1
            }
        },
        "ActiveTrustedSigners": {
            "Enabled": false,
            "Quantity": 0
        },
        "LastModifiedTime": "2017-05-10T16:35:40.754Z",
        "Id": "G1ZAENK49GWYU"
    },
    "ETag": "C4I0SFGSBMGXY"
}

References

Publication date May 7, 2017