Use the Conformity Knowledge Base AI to help improve your Cloud Posture

CloudFormation In Use

Trend Cloud One™ – Conformity is a continuous assurance tool that provides peace of mind for your cloud infrastructure, delivering over 1000 automated best practice checks.

Risk Level: Low (generally tolerable level of risk)
Rule ID: CFM-003

Ensure that Amazon CloudFormation is used within your AWS account to automate your cloud infrastructure management and deployment. CloudFormation is the AWS service that promotes the concept of Infrastructure as Code (IaC), which practically means writing code using a descriptive language (JSON or YAML) to manage configurations and automate provisioning of AWS infrastructures in addition to deployments

This rule can help you with the following compliance standards:

  • APRA
  • MAS

For further details on compliance standards supported by Conformity, see here.

This rule can help you work with the AWS Well-Architected Framework.

This rule resolution is part of the Conformity Security & Compliance tool for AWS.

Sustainability
Operational
excellence

With AWS CloudFormation you will spend less time managing your cloud resources so you can have more time to focus on your applications. CloudFormation has several features and benefits that will allow you to build highly available, reliable, and scalable web infrastructures and automate them based on your application needs. The CloudFormation service benefits include: support for a wide range of AWS resources, stack customization via input parameters such as EC2/RDS instance types, EBS volumes size and port numbers, a declarative and flexible way to define your templates (simple JSON/YAML formatted text files), a user-friendly Drag-and-Drop interface that lets you create, visualize and edit your CloudFormation templates, the control over your infrastructure using a descriptive language (Infrastructure as Code), the ease of use and the integration with your favorite development and management tools or with other Amazon services such as Simple Notification Service (SNS).


Audit

To determine if Amazon CloudFormation is used within your AWS account for resource management and automation, perform the following:

Using AWS Console

01 Sign in to the AWS Management Console.

02 Navigate to CloudFormation dashboard at https://console.aws.amazon.com/cloudformation/.

03 Select the Active option from the Filter dropdown menu to list the active CloudFormation stacks available in the current AWS region. If there are no active stacks listed on the page, instead a Get Started page is displayed, i.e.

Get Started page

the CloudFormation service is not used to manage and automate your AWS infrastructure within the selected region.

04 Change the AWS region from the navigation bar and repeat the audit process for other regions.

Using AWS CLI

01

aws cloudformation describe-stacks
    --region us-east-1

02The command output should return the description for all available CloudFormation stacks:

{
   "Stacks": []
}

If the Stacks array returned by the describe-stacks command does not contain any elements (stack entries and their metadata), the Amazon CloudFormation service is not currently used within the selected AWS region.

Remediation / Resolution

In order to make use of AWS CloudFormation, you must work with templates and stacks. The templates are created to describe your AWS resources and their properties. Whenever you create a stack, CloudFormation provisions the AWS resources defined in your templates. To create your first stack (using a sample template), perform the following:

Using AWS Console

01 Login to the AWS Management Console.

02 Navigate to CloudFormation dashboard at https://console.aws.amazon.com/cloudformation/.

03 Click the Create Stack button from the dashboard top menu.

04 On the Select Template page, inside the Choose a template section, choose one the following options, based on your application requirements:

  1. Choose Select a sample template option and select one of the templates (e.g. Wordpress blog) available in the dropdown list in order to use a sample template for your stack.
  2. Choose Upload a template to Amazon S3 option and use the Browse button to select a CloudFormation template available on your machine in order to upload it to Amazon S3. Use this option if you need to define your own custom templates.
  3. Or choose Specify an Amazon S3 template URL and provide the URL of a template that is already available within an S3 bucket created before. Also, use this option if you want to define your own custom templates.
  4. Click Next to continue the stack setup.

05 On the Specify Details page, enter a name for your stack in the Stack name box. Inside the Parameters section, provide the necessary parameters values required by the CloudFormation template chosen at the previous step. The input parameters displayed on this page are custom and vary based on the given template. Once all parameters are provided, click the Next button to continue the process.

06 On the Options page, perform the following actions:

  1. (Optional) Define the resource tags (key-value pairs) for the stack using the fields available in the Tags section.
  2. In the Permissions section, choose an IAM role that Amazon CloudFormation uses to create, modify, or delete resources in the stack from the IAM Role dropdown list. You can also paste the role ARN (Amazon Resource Name) inside Enter role ARN box.
  3. In the Advanced section, perform the following:
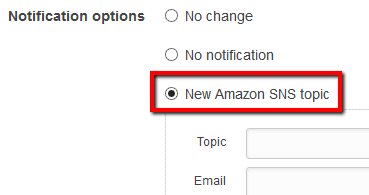
    • Under Notification options, choose whether you want to enable SNS notifications for the stack. Select No notification to disable the feature or select New Amazon SNS topic: New Amazon SNS topic to enable it and create a new SNS topic and subscribe to it using your email address. In the Topic box enter a name for the new SNS topic and in the Email box enter the email address where you want to receive notifications. You can also choose Existing Amazon SNS topic to use a pre-existing SNS topic from the dropdown list: Existing topic ARN or choose Existing topic ARN and type the Amazon Resource Name of an existing SNS topic, e.g. arn:aws:sns:us-east-1:123456789012:MySNSTopic.
    • In the Timeout box, enter the number of minutes before stack creation times out or leave the box empty if you want to disable the stack creation timeout.
    • Use Rollback on failure feature to specify whether the stack should be rolled back if the creation fails.
    • Under the Stack Policy, provide a custom policy where you define the resources that you want to protect from unintentional updates during the stack update process. By default, all AWS resources can be updated during a stack update.
  4. Click Next to access the stack review page.

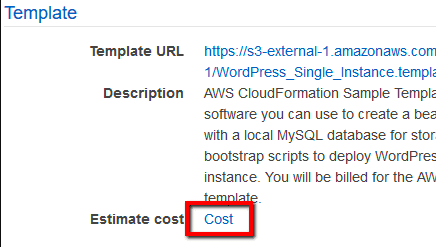
07 On the Review page, review the entire configuration for your CloudFormation stack. (Optional) You can also click the Cost link:

estimate cost of your new stack

to estimate the cost of your new stack.

08 Click Create to launch your new CloudFormation stack. Once the stack has been successfully created, its status should change from CREATE_IN_PROGRESS to CREATE_COMPLETE.

09 Change the AWS region from the navigation bar and repeat the entire process for other regions.

Using AWS CLI

01 Run create-stack command (OSX/Linux/UNIX) to create an AWS CloudFormation stack as specified in the template. The following command example will use a Wordpress blog template, publicly available at https://s3-external-1.amazonaws.com/cloudformation-templates-us-east-1/WordPress_Single_Instance.template to create a stack named CloudConformityCFNStack using an AWS SNS topic to send notifications when an event occurs. The template used is a sample Amazon CloudFormation template that declares all the resources required for building a WordPress blog on a single EC2 instance:

aws cloudformation create-stack
    --region us-east-1
    --stack-name CloudConformityCFNStack
    --template-url https://s3-external-1.
    .com/cloudformation-templates-us-east-1/WordPress_Single_Instance.template
    --parameters ParameterKey=KeyName,ParameterValue=ssh-key
    ParameterKey=SSHLocation,ParameterValue=0.0.0.0/0
    ParameterKey=InstanceType,ParameterValue=c3.large
    ParameterKey=DBName,ParameterValue=wpdb
    ParameterKey=DBUser,ParameterValue=wpdbusr
    ParameterKey=DBPassword,ParameterValue=wordpresspwd1
    ParameterKey=DBRootPassword,ParameterValue=mysqlrootpwd1
    --notification-arns arn:aws:sns:us-east-1:123456789012:MySNSTopic

02 The command output should return the new CloudFormation stack identifier (ID):

{
    "StackId": "arn:aws:cloudformation:us-east-1:123456789012:stack/CloudConformityCFNStack/40590a90-e55f-11e6-9e4c-50fae9882890"
}

03 Run describe-stacks command (OSX/Linux/UNIX) using custom query filters to describe the current status for the stack created at the previous step:

aws cloudformation describe-stacks
    --region us-east-1
    --stack-name CloudConformityCFNStack
    --query 'Stacks[*].StackStatus'

04 The command output should return the CloudFormation stack current status. If the stack creation is still in progress, the output should be "CREATE_IN_PROGRESS". If the stack has been successfully created, the command output should be "CREATE_COMPLETE" (as shown in the example above):

[
    "CREATE_COMPLETE"
]

05Change the AWS region by updating the --region command parameter value and repeat steps 1 – 4 to perform the entire process for other regions.

References

Publication date Feb 6, 2017