Serverless technologies enable developers to concentrate on what the application does without the hassle of managing where it runs and how it scales. The cloud provider manages infrastructure, simply upload the applications, and the provider handles the rest.
This article highlights the benefits of going serverless by walking through creating a serverless REST API using AWS Lambda and Node.js.
Setting Up the Local Environment
This tutorial requires the following dependencies:
- Node.js
- AWS Command Line Interface (CLI)
- AWS CLI configuration (with your access keys)
- Serverless framework installed with the following command: npm install serverless -g
Now that the environment is almost ready, it’s time to initialize our project. Let’s make a new folder for the project, and from within the folder, do the following:
First, create a boilerplate serverless project to provide a template:
create --template aws-nodejs --name trendmicro
Then, install serverless offline into our project:
npm install serverless-offline --save-dev
We now have a project containing the serverless.yml and handler.js files. The serverless.yml file is a YAML configuration file that describes our serverless application’s functions, resources, plugins, and other necessary config information. The handler.js file is an example handler that provides a “hello world” REST API function.
The final step of our setup is to add the serverless-offline package we just installed to the YAML config file as a plugin. The following is a simplified version of the YAML file with the serverless-offline plugin.
service: trendmicro
frameworkVersion: '2'
provider:
name: aws
runtime: nodejs14.x
lambdaHashingVersion: 20201221
stage: dev
region: eu-west-1
plugins:
- serverless-offline
functions:
hello:
handler: handler.hello
events:
- httpApi:
path: /hello
method: get
The service property specifies the service name, and the provider section details which service provider to use — in our case, AWS — and any configuration properties.
The plugins section specifies which plugins to use. For now, we just require the serverless-offline plugin. We will discuss why we need this shortly. Finally, the functions section details which functions should be available in our AWS Lambda function and their configuration. Again, we go into more detail about this configuration in the next section.
Building the API
Now we have the boilerplate for a straightforward REST API that exposes an endpoint at /hello. We must look at our handler to define what happens when we hit that endpoint.
The template created the handler.js file for us. We can see from the YAML file that it should contain a hello function.
'use strict';
module.exports.hello = async (event) => {
return {
statusCode: 200,
body: JSON.stringify(
{
message: 'Go Serverless v1.0! Your function executed
successfully!',
input: event,
},
null,
2
),
};
// Use this code if you don't use the http event with the LAMBDA-PROXY integration
// return { message: 'Go Serverless v1.0! Your function executed successfully!', event };
};
As expected, the file exports a function called hello. This function may look straightforward, but it provides us with necessary information about creating REST functions using serverless APIs. First, our function must take an event parameter. This event triggers the Lambda function. In our case, it is a GET request to the relevant URL.
Second, the function shows us the required structure of the object that the GET request should return. The object requires an HTTP status code and a body that must be a string, so if we would like to return a JSON object as the body, we must convert it to a string first.
It is that simple. This function can perform any required business logic, and if it returns the object in the correct format, we have a functioning REST API. We run it in offline mode using the serverless-offline plugin to test it. This approach enables us to test our API logic locally before deploying the Lambda function to AWS. To run our serverless API offline, we simply run serverless offline.
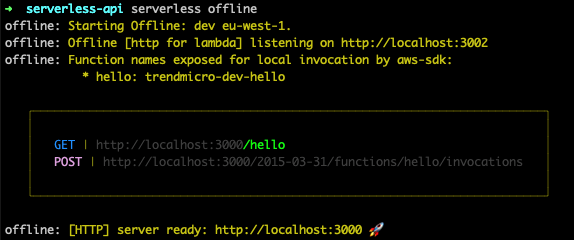
The figure above shows that the serverless API should now be running locally and will output the available endpoints. The first is the GET endpoint we configured in the YAML file and is available at the /hello endpoint. We can test the endpoint by going to that URL in a web browser. If everything works correctly, we should see the JSON object that our hello function returned in our handler.
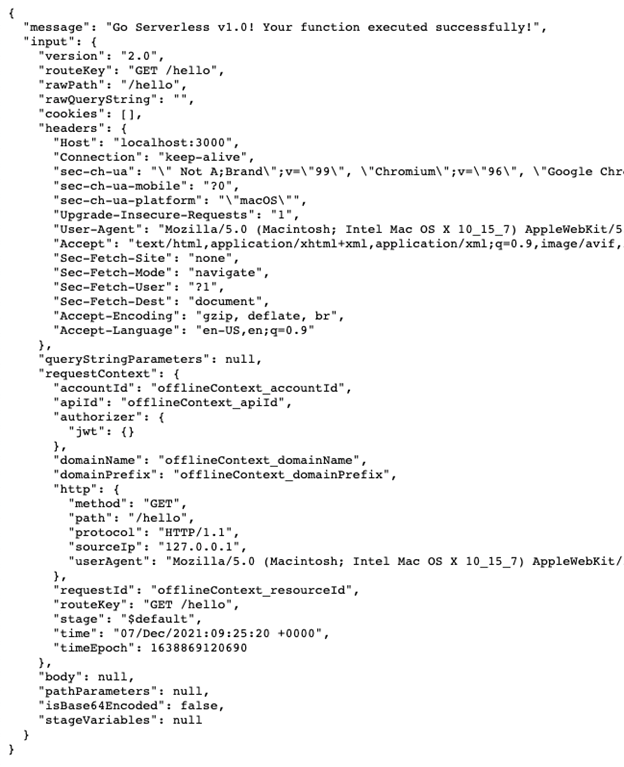
Remember, we returned an object with a body property in the handler. This body property appears when we hit our endpoint. The body property contained an object with a message property set to a string and an input property, which is the event triggered when we hit our endpoint. The figure above shows that this event contains the request data, such as query string parameters and header information.
Now that we have implemented the basics let’s add some use-value to our endpoints.
Mocking Up a More Useful API
We’ll leave the original handler in place along with the hello function and create a brand-new handler to host our new logic. We make GET, POST, PATCH, and DELETE endpoints to mock up an everyday use case — CRUD operations for a database. Let’s assume we have a database to store user data, and we need an API to help us create, update, and delete users and retrieve user data from the database.
functions:
hello:
handler: handler.hello
events:
- httpApi:
path: /hello
method: get
get:
handler: user.get
events:
- httpApi:
path: /user/{id}
method: get
create:
handler: user.create
events:
- httpApi:
path: /user
method: post
update:
handler: user.update
events:
- httpApi:
path: /user/{id}
method: patch
delete:
handler: user.delete
events:
- httpApi:
path: /user/{id}
method: delete
Our first step is to define the four endpoints in the serverless YAML file. Like our hello endpoint, we want to create one for each action, as shown above, but there are some subtle differences.
- We are using a different handler. It helps us logically separate our user endpoint functions into their files.
- We have defined the HTTP method required for each endpoint. It is essential that we do this and that no two endpoints have the same path and method. Otherwise, it does not work.
- We added an {id} placeholder to some of the endpoints. This placeholder allows us to call the endpoint with a specific user ID. We must do this for all actions apart from the create action, which creates a new user and requires no identifier.
Now that we have defined our endpoints, we must make the handler and the respective functions.
Creating a Handler File
Now we create a file called user.js to act as the handler. We must create four functions for each action, starting with the create action.
// object to hold our functions that can be exported at the end
const userHandler = {};
// handler to create a new user and store it
userHandler.create = async (event) => {
// parse the body of the incoming payload
const body = JSON.parse(event.body)
// create our user and store in the database
const user_id = await createUserInDB(body)
// return a success message along with the user_id so we can use it in future examples
return {
statusCode: 200,
body: JSON.stringify({user_id, message: 'user created successfully'})
};
};
There is plenty of functionality in this, so let’s break it down.
First, we pass the event as a parameter again. Remember that this holds all the information about the request. When we send a request to the create endpoint, we must also send data about the user we want to store in the database, such as email address, password, and name. We send this in the request body, which we can parse from the event.
// parse the body of the incoming payload
const body = JSON.parse(event.body)
We can then pass this data to a function that handles creating a user with those details in the database. Once done, we return the same payload as we did in our “hello” example. Now, let’s test it out in Postman.
First, we start the application.
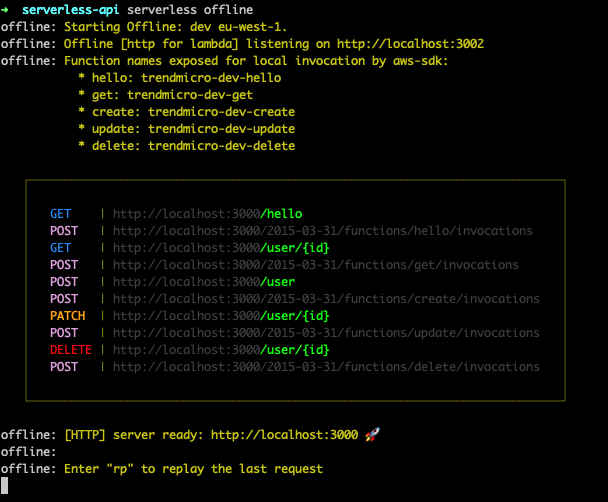
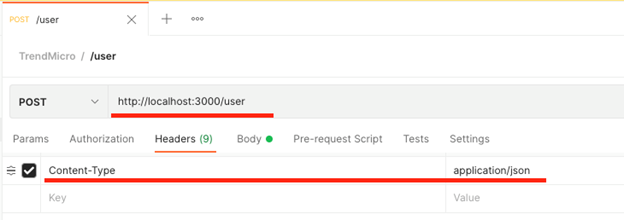
We create a mock post request within Postman. We can copy the URL from our application's output, then set the Content-Type to application/json in the headers.
We can then create our body that we pass to the application. Usually, the body would come from a front-end form that the user has filled in to pass to the API.
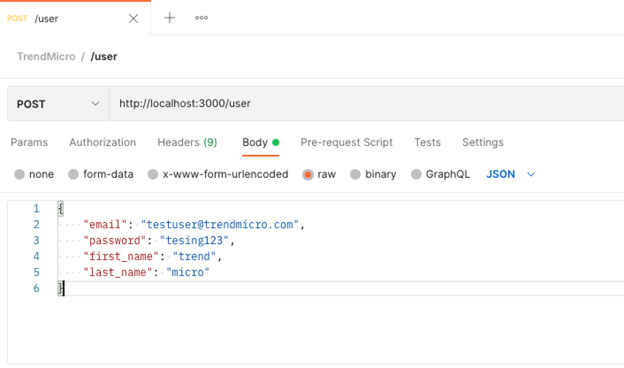
We can then click Send in Postman and check its response.

The message returned is what we expect, and we can also see that the status code is 200.

Our serverless application also logged some information, as the figure above shows. First, it tells us that the request was a POST request to the /user endpoint and that it should call the lambda function called create. It then logs a RequestId, which is essential to understand which requests generated certain logs, especially after deploying onto AWS. Finally, we get some detail about how long the request took and how much AWS would count toward billing.
We can now do the same for the other functions. As we can successfully create users, fetching their details from the database using the GET endpoint makes sense.
// handler to fetch a user from the database
userHandler.get = async (event) => {
// grab the userId from the URL
const userId = parseInt(event.pathParameters.id);
const user = getUserFromDB(userId)
let body = user
let statusCode = 200
if(!user){
statusCode = 404
body = 'User not found!'
}
return {
statusCode,
body: JSON.stringify(body)
};
};
The GET endpoint takes no data from the body. Instead, it requires a user ID in the URL. This is the purpose of our placeholder in the YAML file. Again, the event parameter in our function pulls these path parameters out and into an object. So, we can access them with the following syntax:
// grab the userId from the URL
const userId = parseInt(event.pathParameters.id);
We must parse it as an integer because that’s what was in the database. Now that we have the user ID, we can fetch it from the database.
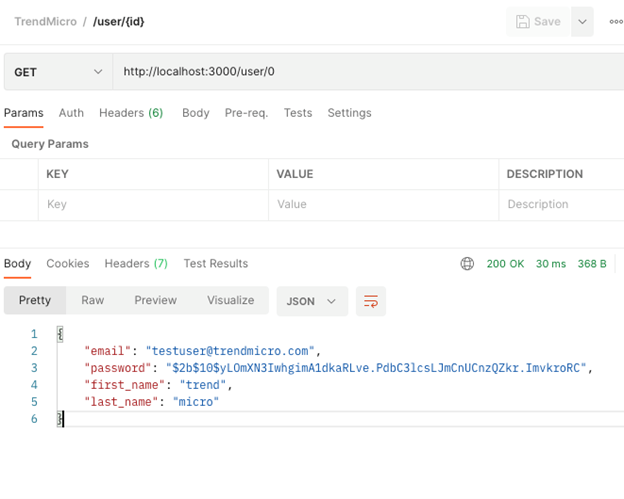
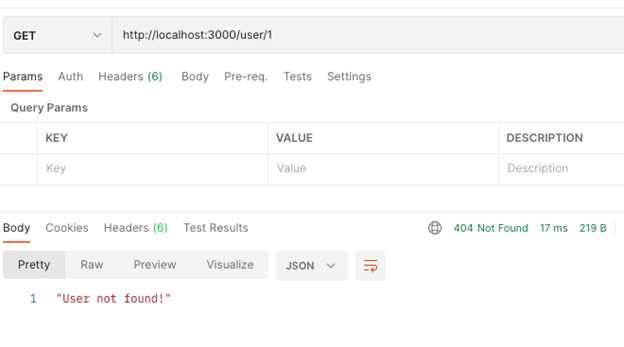
If we find a user with that ID, we return status code 200 as before and the user object in the body, as the figure above shows. However, if we do not find a user, we want to return the correct status code (404) and an error message, as the figure below shows.
Finally, we can create our update and delete functions. The update function combines the logic in the create and GET user functions. First, it must fetch a user from the database. Then it must parse the Body from the request, enabling it to apply the update before storing the user back in the database.
// handler to update a user in the database
userHandler.update = async (event) => {
// grab the userId from the URL
const userId = parseInt(event.pathParameters.id);
let user = getUserFromDB(userId)
if(!user){
return {
statusCode: 404,
body: JSON.stringify('User not found')
}
}
// parse the body of the incoming payload
const body = JSON.parse(event.body)
user = { ...user, ...body }
// write the changes to the database
await updateUserInDB(userId, user)
The delete endpoint is like our get endpoint, but it deletes the user from the database instead of fetching it.
// handler to delete a user from the database
userHandler.delete = async (event) => {
// grab the userId from the URL
const userId = parseInt(event.pathParameters.id);
// delete the user from the database
const user = await deleteUserInDB(userId)
let body = `User ${user} successfully deleted`
let statusCode = 200
if(!user){
statusCode = 404
body = 'User not found!'
}
return {
statusCode,
body: JSON.stringify(body)
};
};
That’s all there is to it. You now have a fully-functioning API that performs standard database CRUD functions. The next step is to deploy the API to AWS for use in a production environment.
Deploying the API
Deployment of a serverless application is straightforward. By wrapping everything in the serverless YAML file, we’ve abstracted all the deployment complexity and let AWS deal with deployment, including determining where it should deploy and with which resources. As a bonus, because we’ve created our code as a Lambda, it will also automatically handle scaling for us.
To deploy the application, simply run the serverless deploy package. This action will package the application and set up all the necessary dependencies. It does require our AWS user to have specific permissions for services like Amazon S3 and Amazon CloudWatch, but it will gracefully throw an error and let us know what permissions are missing, if any.
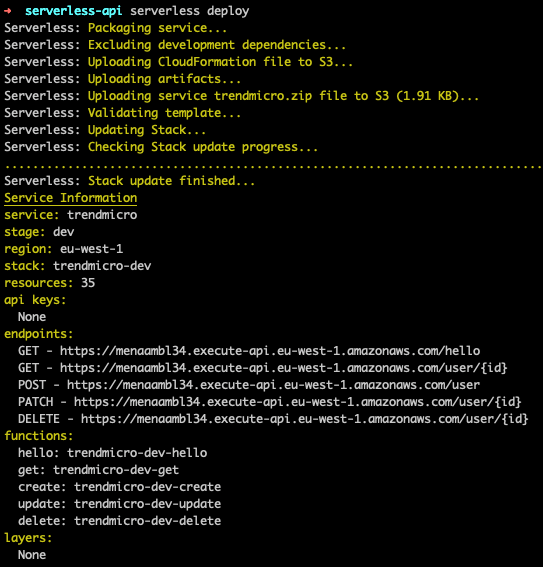
Once deployed, like when running our API offline, we get a list of available endpoints. Instead of pointing at our local machine, these endpoints are now available in the cloud. In Postman, we can now swap out the localhost endpoints for these and test that they still work as expected.
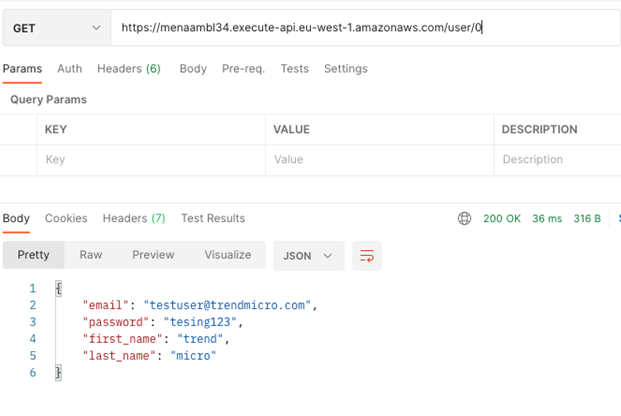
One final consideration is our application’s security. As seen in this example, the endpoint is now available on the internet and potentially accessible by anyone. We kept our API simple for demonstration purposes, excluding measures like authorization and locking down the API endpoints to specific virtual private clouds (VPCs). You can find more information about how to secure your API on Amazon’s blog.
Conclusion
By providing a bit of simple configuration, we built an API that our service provider — in this instance, AWS fully manages. They take care of deploying the application, ensuring the proper infrastructure is in place, and scaling that infrastructure based on the current demand on the Lambda function.
Overall, this results in lower development costs, as we can quickly build, test, and deploy our applications. It can also save on running costs because the Lambda function auto-scales to its current demand, maintaining the best overall efficiency when demand is low.
Explore how Trend Micro Cloud OneTM – Application Security can provide detection and protection for modern applications and APIs built on your container, serverless, and other computing platforms.


