Use the Conformity Knowledge Base AI to help improve your Cloud Posture

Unused Redshift Reserved Nodes

Trend Cloud One™ – Conformity is a continuous assurance tool that provides peace of mind for your cloud infrastructure, delivering over 1000 automated best practice checks.

Risk Level: High (not acceptable risk)
Rule ID: RS-016

Ensure that all your AWS Redshift Reserved Nodes (RN) have corresponding database nodes running within the same account or within any AWS accounts members of an AWS Organization (if there is one created). A corresponding database node is a running Redshift node that matches the reservation parameters such as Region and Node Type.

This rule can help you work with the AWS Well-Architected Framework.

This rule resolution is part of the Conformity Security & Compliance tool for AWS.

Sustainability
Cost
optimisation

When an AWS Redshift Reserved Node is not being used, the investment made is not valorized. For example, if you reserve a ds2.xlarge Redshift node within US East (N. Virginia) region and you don't launch a node with the same type, in the same region of the same AWS account or in any other member AWS accounts available within your AWS Organization, the specified Redshift RN is considered unused and you end up paying for resources that you don't use.


Audit

To determine if you have any unused Redshift Reserved Nodes within your AWS account or your AWS Organization (if there is one created), perform the following:

Using AWS Console

01 Sign in to the AWS Management Console.

02 Navigate to Redshift dashboard at https://console.aws.amazon.com/redshift/.

03 In the left navigation panel, choose Reserved Nodes.

04 Select Active from the status dropdown list:

Select Active from the status dropdown list

to list only the active reservations.

05 Choose the active Redshift Reserved Node (RN) that you want to examine.

06 Click Show or Hide Item Details button to expand the details panel and verify the Node Type attribute value used for reservation (e.g. ds2.xlarge).

07 Within the same AWS region, in the navigation panel, under Redshift Dashboard click Clusters.

08 Choose the Redshift cluster that you want to examine for corresponding nodes then click on its identifier link, listed in the Cluster column.

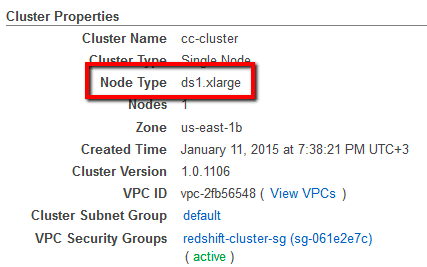
09 On the selected cluster Configuration tab, in the Cluster Properties section, check the Node Type attribute value, e.g.

Node Type

10 Now repeat step no. 8 and 9 for other Redshift clusters provisioned in the current AWS region. If none of the verified AWS Redshift clusters have active nodes that match the reservation type (node type) parameter identified at step no. 6, the selected Reserved Node does not have a corresponding node running within the Redshift clusters available in the current region, therefore the selected Redshift RN is not utilized.

11 If you are using Consolidated Billing and the current AWS account is member of an AWS Organization, access the Redshift clusters configuration page on each linked account, under the same region, and repeat step no. 8 and 9 to check for any corresponding Redshift cluster nodes.

12 Repeat steps no. 5 - 11 for other Redshift Reserved Nodes (RNs) available in the current region.

13 Change the AWS region from the navigation bar and repeat the entire audit process for other regions.

Using AWS CLI

01 Run describe-reserved-nodes command (OSX/Linux/UNIX) using custom query filters to list the node type for all Redshift Reserved Nodes purchased in the selected AWS region:

aws redshift describe-reserved-nodes
    --region us-east-1
    --output table
    --query 'ReservedNodes[*].NodeType'

02 The command output should return a table with the requested Redshift RN node(s) type:

-----------------------
|    ReservedNodes    |
+---------------------+
|     ds2.xlarge      |
+---------------------+

03 Run describe-clusters command (OSX/Linux/UNIX) using custom query filters to list the identifiers (names) of all Redshift clusters currently available within the selected region:

aws redshift describe-clusters
    --region us-east-1
    --output table
    --query 'Clusters[*].ClusterIdentifier'

04 The command output should return a table with the requested cluster names:

----------------------
|  DescribeClusters  |
+--------------------+
|  cc-cluster        |
|  cc-cda-cluster    |
|  cc-bg1-cluster    |
+--------------------+

05 Run again describe-clusters command (OSX/Linux/UNIX) using the name of cluster that you want to examine as identifier and the necessary query filters to expose the node(s) type used by the selected AWS Redshift cluster:

aws redshift describe-clusters
    --region us-east-1
    --cluster-identifier cc-cluster
    --query 'Clusters[*].NodeType'

06 The command output should return the Redshift node type currently used:

[
    "ds1.xlarge"
]

Now repeat step no. 5 and 6 for other Redshift clusters provisioned in the current AWS region. If none of the verified AWS Redshift clusters have active nodes that match the reservation type (i.e. node type) attribute identified at step no. 2, the selected Reserved Node does not have a corresponding cluster node provisioned within the current region, therefore the selected Amazon Redshift RN is not being used.

07 If you have an active AWS Consolidated Billing implementation and the current AWS account is member of an AWS Organization, repeat step no. 1 and 2 to check for the corresponding Redshift cluster nodes within other AWS accounts, members of your AWS Organization.

08 Repeat steps no. 1 – 7 for other Redshift RNs purchased within the current region.

09 Change the AWS region by updating the --region command parameter value and perform the audit process for other regions.

Remediation / Resolution

Once purchased, AWS Redshift Reserved Nodes cannot be modified, canceled or sold on Amazon Reserved Instance Marketplace and you will be billed for these resources regardless of whether you use them or not. To make use of your investment, you can provision and utilize a corresponding Redshift cluster node for each unused Reserved Node purchased within the current AWS account or within any other member accounts available in your AWS Organization (if you are using one). To provision new Redshift clusters using nodes that match the RNs purchase criteria, perform the following:

Using AWS Console

01 Sign in to the AWS Management Console.

02 Navigate to Redshift dashboard at https://console.aws.amazon.com/redshift/.

03 In the left navigation panel, under Redshift Dashboard, click Clusters.

04 Click Launch Cluster button from the dashboard top menu to start the cluster setup process.

05 On the Cluster Details configuration page, enter a unique name for your new cluster in the Cluster Identifier field and fill out the rest of the fields available on this page based on your project/application requirements.

06 Click the Continue button to continue the setup process.

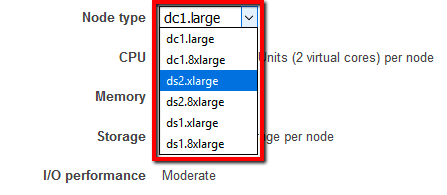
07 On the Node Configuration page, select the node type that match the specified RI criteria (see Audit section part I, step no. 6 to identify the right node type used for reservation) from the Node type dropdown list:

Node type dropdown list

then configure the number of nodes that the cluster can use based on your project requirements.

08 Click Continue to move on with the setup process.

09 On the Additional Configuration page configure the cluster encryption and networking settings.

10 Click Continue to load the next page.

11 On the Review page, review the cluster properties, its database details, the security and encryption configuration, then click Launch Cluster to build the new AWS Redshift cluster that utilizes corresponding nodes.

12 On the confirmation page click Close to return to the Redshift dashboard. Once the Cluster Status value changes to available and the DB Health status changes to healthy, the new cluster is ready.

13 Repeat steps no. 4 – 12 to provision corresponding Redshift nodes (within new clusters) for other Amazon Redshift RNs purchased in the current AWS region/account or within any other member accounts available in your AWS Organization (if you are using one).

14 Change the AWS region from the navigation bar and repeat the entire process for other regions.

Using AWS CLI

01 Run create-cluster command (OSX/Linux/UNIX) to create a new Amazon Redshift cluster with corresponding cluster nodes that match the existing RN purchase criteria. The following command example creates an Amazon Redshift cluster using ds2.xlarge nodes within US East (N. Virginia) AWS region:

aws redshift create-cluster
    --region us-east-1
    --cluster-identifier cc-new-cluster
    --cluster-type multi-node
    --node-type ds2.xlarge
    --number-of-nodes 2
    --db-name ccclusterdb
    --master-username ccclusteruser
    --master-user-password CCclusterpwd5
    --vpc-security-group-ids sg-43ac0d58
    --availability-zone us-east-1a
    --port 5439
    --cluster-subnet-group-name default
    --cluster-parameter-group-name default.redshift-1.0
    --automated-snapshot-retention-period 1
    --publicly-accessible
    --allow-version-upgrade
    --no-encrypted

02 The command output should return the new Redshift cluster configuration metadata:

{
    "Cluster": {
        "PubliclyAccessible": true,
        "MasterUsername": "ccclusteruser",
        "NumberOfNodes": 2,
        "PendingModifiedValues": {
            "MasterUserPassword": "****"
        },
        "VpcId": "vpc-3d86051",
        "ClusterVersion": "1.0",

       ...

        "DBName": "ccclusterdb",
        "PreferredMaintenanceWindow": "fri:06:00-fri:06:30",
        "AllowVersionUpgrade": true,
        "ClusterSubnetGroupName": "default",
        "ClusterSecurityGroups": [],
        "ClusterIdentifier": "cc-new-cluster",
        "AvailabilityZone": "us-east-1a",
        "NodeType": "ds2.xlarge",
        "Encrypted": false,
        "ClusterStatus": "creating"
    }
}

03 Repeat step no. 1 and 2 to provision corresponding Redshift nodes (within newly created clusters) for other Amazon Redshift RNs purchased in the current AWS region/account or within any other member accounts available in your AWS Organization (if applicable).

04 Change the AWS region by updating the --region command parameter value and perform the remediation entire process for other regions.

References

Publication date Mar 7, 2017