Use the Conformity Knowledge Base AI to help improve your Cloud Posture

Instance In Auto Scaling Group

Trend Cloud One™ – Conformity is a continuous assurance tool that provides peace of mind for your cloud infrastructure, delivering over 1000 automated best practice checks.

Risk Level: Medium (should be achieved)
Rule ID: EC2-027

Orphaned EC2 Instances to make sure every instance is launched within an AWS Auto Scaling Group in order to help improve the availability and scalability of your web applications during instance failures or denial-of-service attacks (DoS, DDoS).

This rule can help you with the following compliance standards:

  • MAS
  • NIST4

For further details on compliance standards supported by Conformity, see here.

This rule can help you work with the AWS Well-Architected Framework.

This rule resolution is part of the Conformity Security & Compliance tool for AWS.

Sustainability
Reliability
Security

As good practice, every EC2 instance should be launched inside an AWS Auto Scaling Group. To achieve zero downtime, Cloud Conformity recommends attaching an Elastic Load Balancer (ELB) to the Auto Scaling Group (ASG) in order to use ELB health checks in combination with the ASG to identify unhealthy instances and cycle them out automatically. This auto-scaling configuration can also help to maintain optimal the resiliency and availability of your applications during DDoS attacks by scaling and absorbing the attacks.


Audit

To identify any orphaned EC2 Instances (i.e. instances that don't belong to any ASG), perform the following:

Using AWS Console

01 Sign in to the AWS Management Console.

02 Navigate to EC2 dashboard at https://console.aws.amazon.com/ec2/.

03 In the left navigation panel, under INSTANCES section, choose Instances.

04 Select the EC2 instance that you want to examine.

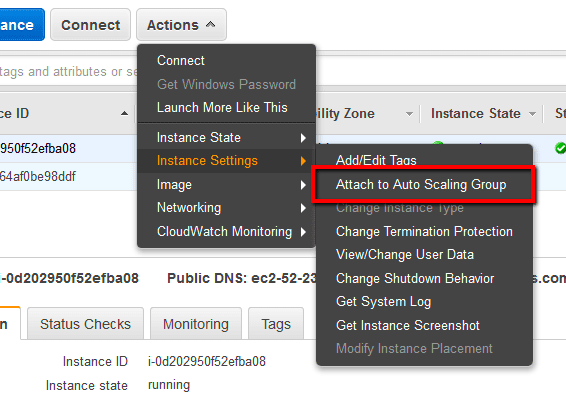
05 Click on the Actions dropdown button from the dashboard top menu, select Instance Settings and verify the Attach to Auto Scaling Group command link state. If the command link is active, i.e.

select Instance Settings and verify the Attach to Auto Scaling Group command link state

the selected EC2 instance is not currently running within an AWS Auto Scaling Group (ASG), therefore the running instance is not configured to follow AWS best practices.

06 Repeat step no. 4 and 5 to verify if the rest of the EC2 instances provisioned in the current region are running inside an Auto Scaling Group.

07 Change the AWS region from the navigation bar and repeat the audit process for the other regions.

Using AWS CLI

01 Run describe-instances command (OSX/Linux/UNIX) using appropriate filtering to list the IDs of all the existing EC2 instances currently available in the selected region:

aws ec2 describe-instances
	--region us-east-1
	--output table
	--query 'Reservations[*].Instances[*].InstanceId'

02 The command output should return a table with the requested instance IDs:

-------------------------
|   DescribeInstances   |
+-----------------------+
|  i-0d202950f52efba08  |
|  i-0db1164af0be98ddf  |
|  i-0455346e06d9425e5  |
|  i-043801b9c55f55f5c  |
|  i-0b9cdfa00d01f7d0b  |
+-----------------------+

03 Run describe-auto-scaling-instances command (OSX/Linux/UNIX) using custom filtering to list the IDs of all EC2 instances that are currently running within an AWS ASG, provisioned in the selected region:

aws autoscaling describe-auto-scaling-instances
	--region us-east-1
	--output table
	--query 'AutoScalingInstances[*].InstanceId'

04 The command output should return a table with the ID(s) of the EC2 instance(s) launched within an auto-scaling configuration:

-------------------------
|   DescribeInstances   |
+-----------------------+
|  i-0455346e06d9425e5  |
|  i-043801b9c55f55f5c  |
|  i-0b9cdfa00d01f7d0b  |
+-----------------------+

Now compare the metadata from the table returned at step no. 2 with the one returned at step no. 4 in order to identify any EC2 instances that are not currently running within AWS Auto Scaling Groups by using their ID as identifier. Any EC2 instances, provisioned in the current region, that are not listed in the second table are not using an ASG for auto-scaling, therefore are not configured to follow AWS best practices.

05 Repeat steps no. 1 – 4 to repeat the audit process for the other AWS regions.

Remediation / Resolution

To deploy a running EC2 instance into an AWS auto-scaling configuration using Auto Scaling Groups (ASGs) and Elastic Load Balancers (ELBs) for high reliability and security, perform the following:

Using AWS Console

01 Sign in to the AWS Management Console.

02 Navigate to EC2 dashboard at https://console.aws.amazon.com/ec2/.

03 First, attach the orphaned EC2 instance to a new Auto Scaling Group by performing the following actions:

  1. In the left navigation panel, under INSTANCES section, choose Instances.
  2. Select the orphaned EC2 instance that you want to deploy into an AWS ASG-ELB configuration.
  3. Click on the Actions dropdown button from the dashboard top menu, select Instance Settings and click Attach to Auto Scaling Group command link.
  4. In the Attach to Auto Scaling Group dialog box, select a new Auto Scaling group and provide a name for the new ASG in the Auto Scaling Group Name box. The launch configuration will take the same name as the ASG and the Auto Scaling Group will receive the attributes of the selected instance.
  5. Click Attach to create the new ASG and the required launch configuration.

04 Create an AWS Elastic Load Balancer that will be associated later with the new ASG:

  1. In the navigation panel, under LOAD BALANCING, select Load Balancers and click the Create Load Balancer button.
  2. On the Define Load Balancer page, provide the following information:
    • Enter a name for your ELB in the Load Balancer name box.
    • Select the same VPC used by your EC2 instance from the Create LB inside dropdown list.
    • In the Listener Configuration section, click Add to add new listeners (e.g. HTTPS (Secure HTTP)) based on your application(s) requirements.
    • Click Next: Assign Security Groups to continue the setup process.
  3. On the Assign Security Groups page, choose Select an existing security group and select the security group(s) associated with your EC2 instance. Click Next: Configure Security Settings to continue.
  4. If you configured your ELB to use the HTTPS (Secure HTTP) listener, on the Configure Security Settings page, provide the following information:
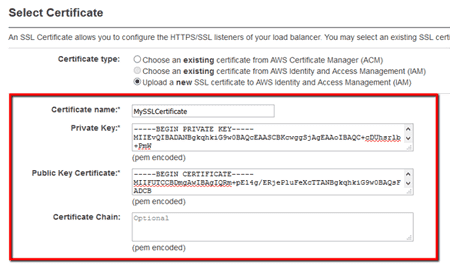
    • In the Select Certificate section, select one of the following options:
      • Choose an existing certificate from AWS Certificate Manager (ACM) - to use an existing SSL certificate purchased via AWS Certificate Manager. If you haven’t purchased yet any SSL certificates you can click Request a new ACM certificate link and AWS will redirect your request to the ACM dashboard where you can buy the certificate.
      • Choose an existing certificate from AWS Identity and Access Management (IAM) - to use an existing SSL certificate uploaded previously to AWS IAM through the ELB dashboard. Select the name of your SSL certificate from the Certificate dropdown list.
      • Upload a new SSL certificate to AWS Identity and Access Management (IAM) - deploy an SSL certificate purchased by entering the required information: deploy an SSL certificate purchased by entering the required information granted by the SSL provider from which you bought the certificate.
    • In the Select a Cipher section, select the latest AWS Security Policy available from the Predefined Security Policy dropdown list. Click Next: Configure Health Check to continue the process.
  5. On the Configure Health Check page, provide the following information:
    • Leave Ping Protocol set to HTTP (default value).
    • Leave Ping Port set to 80 (default value).
    • In the Ping Path box, replace the default value with a single forward slash (i.e. "/").
    • In the Advanced Details section, set the health check configuration based on your requirements, otherwise leave the predefined values recommended by AWS. Click Next: Add EC2 Instances to continue.
  6. On the Add EC2 Instances page, select the EC2 instance attached to the ASG at step no. 3, leave the default settings and click Next: Add Tags.
  7. On the Add Tags page, create the necessary tags for the ELB based on your requirements. Once you’re done click Review and Create.
  8. On the Review page, review the setup configuration details then click Create to create the ELB. If successful, the following message will be displayed: "Load balancer <load balancer name> was successfully created.". Click Close to return to the ELB dashboard.
  9. Select the Description tab from the dashboard bottom panel and copy the A record (e.g. MyASGLoadBalancer-14239574696.us-east-1.elb.amazonaws.com) next to the DNS name.

05 Configure the EC2 instance Auto Scaling Group for high availability and integrate it with the ELB created at the previous step:

  1. In the left navigation panel, under AUTO SCALING, choose Auto Scaling Groups and select the ASG created at step no. 3.
  2. Select the Details tab from the dashboard bottom panel and click the Edit button to configure your ASG with the following information:
    • In the Load Balancer box, enter the name of the ELB created at step no. 4.
    • In the Desired, Min and Max fields enter 1 as the value of the instances that the Auto Scaling group should have at any time.
    • Select ELB from the Health Check Type dropdown list so the ASG can delegate the health checks to the ELB, which is capable of checking your application URL. This method is preferred over the ASG health checks which performs the checking at the instance hypervisor level.
    • In the Health Check Grace Period box, enter 180 (3 minute) as value for the grace period. This indicates how long the ASG should wait until it starts using the ELB health check in order to avoid marking incorrectly any EC2 instance that is still booting as unhealthy.
    • Click the Save button to apply the changes.

06 Replace the EC2 instance Public IP/Elastic IP with the ELB DNS name copied at step no. 4 (i) for the appropriate A record within your DNS zone file.

07 Repeat steps no. 3 – 6 to implement the recommended auto-scaling configuration to other orphaned EC2 instances available in the current region.

08 Change the AWS region from the navigation bar to repeat the entire process for instances available in the other regions.

Using AWS CLI

01 Run describe-instances command (OSX/Linux/UNIX) to list the orphaned EC2 instance metadata. The metadata returned will be useful later when the required Elastic Load Balancer will be created:

aws ec2 describe-instances
	--region us-east-1
	--instance-ids i-015931d1a0355b6f9
	--query 'Reservations[*].Instances[*].[SecurityGroups,SubnetId]'

02 The command output should return the EC2 instance metadata requested (highlighted):

[
    [
        {
            "GroupName": "MyEC2SecurityGroup",
            "GroupId": "sg-3f462a44"
        }
    ],
    "subnet-2b394201"
]

03 Run create-load-balancer command (OSX/Linux/UNIX) using the orphaned instance metadata returned at the previous step metadata to create a new Elastic Load Balancer (ELB) that will be integrated later with the Auto Scaling Group (ASG):

aws elb create-load-balancer
	--region us-east-1
	--load-balancer-name MyASGLoadBalancer
	--listeners "Protocol=HTTP,LoadBalancerPort=80,InstanceProtocol=HTTP,InstancePort=80"
	--subnets subnet-2b394201
	--security-groups sg-3f462a44

04 The command output should return the DNS name for the newly created ELB:

{
    "DNSName": "MyASGLoadBalancer-378424676.us-east-1.elb.amazonaws.com"
}

05 Now run configure-health-check command (OSX/Linux/UNIX) to configure the load balancer health check using the attributes values recommended below (highlighted):

aws elb configure-health-check
	--region us-east-1
	--load-balancer-name MyASGLoadBalancer
	--health-check Target=HTTP:80/,Interval=30,UnhealthyThreshold=5,HealthyThreshold=2,Timeout=3

06 The command output should return the new health check configuration for the load balancer:

{
    "HealthCheck": {
        "HealthyThreshold": 5,
        "Interval": 30,
        "Target": "HTTP:80/",
        "Timeout": 3,
        "UnhealthyThreshold": 2
    }
}

07 Finally, run create-auto-scaling-group command (OSX/Linux/UNIX) to create the Auto Scaling Group for the orphaned EC2 instance and integrate it with the Elastic Load Balancer created at step no. 3 (if successful, the command does not return an output):

aws autoscaling create-auto-scaling-group
	--region us-east-1
	--auto-scaling-group-name MyEC2InstanceASG
	--instance-id i-015931d1a0355b6f9
	--min-size 1
	--max-size 1
	--desired-capacity 1
	--load-balancer-names MyASGLoadBalancer
	--health-check-type ELB
	--health-check-grace-period 180
	--vpc-zone-identifier subnet-2b394201

08 Replace the EC2 instance Public IP/Elastic IP with the ELB DNS name returned at step no. 4 for the appropriate A record within your DNS zone file.

09 Repeat steps no. 1 – 8 to implement the recommended auto-scaling configuration to other orphaned EC2 instances available in the current region.

10 Repeat steps no. 1 – 9 to perform the entire process within other AWS regions.

References

Publication date Jun 19, 2016